
You'll hopefully have guessed by now that the main food trends of 2013 are basically rehashed, re-released, or reinvented classics made trendy again through 'buzz'.
So to the Chinese steamed bun, a revival of a Cantonese recipe and technique that's a good few hundred years old.
But of course it's been 'modernised' (what does that even mean, I ask you?); where a traditional cha sui bao has the filling stuffed inside the roll, kind of like a meaty dumpling, the trendy Chinese steamed bun uses the bun, well, like a bun, and has the filling added afterwards.
The buns are becoming a major craving for street foodies, particularly with the most famous retailer, Yum Bun in Broadway Market, being the subject of rave reviews and critic's write-ups all over. You couldn't have opened a January edition of any food magazine without seeing them mentioned in some context.
Chinese steamed buns, unlike the gourmet hot dog or forthcoming doughnut, are also pretty darn healthy; ideal for post-festive cleansing. That is so long as you fill them with lean meat and vegetables, rather than lard and brown sugar. Tempting...
So for a soft, light, mouth-watering taste of China head to Broadway Market, or if you've got 3 hours to spare (yeah, sorry about that) make your own at home.
Other than copious amounts of time, the only specialist equipment you'll need is a bamboo steamer. You could use a metal one or a steaming plate but the bamboo steams the buns more reliably and evenly.
Ingredients to make 4 large buns:
280g of plain flour (I used '00' for an extra light bun)
35g of caster sugar
7g of dried yeast (1 sachet)
1/2 tsp of salt
1 tbsp of vegetable oil
Warm water (Not hot, you should be able to comfortably hold your finger in it)
Firstly you need to make a mini starter, or a pre-ferment, just to get the yeast going. In a large glass bowl add 4 tbsps of the flour (about 60g), the yeast, 1 tsp of the caster sugar (about 5g) and 4 tbsps of warm water and mix together so that it resembles a loose dough. Cover the bowl with a damp teatowel and leave in a warm place (I lack an airing cupboard and so put my yeasty doughs under the radiator in the kitchen) for 30 minutes. When it's done it'll be puffed up, full of air holes, and smell a bit like beer.
 |
| It's alive, ALIVE! |
To this mixture you can then add in the rest of the flour and sugar, the salt, and the vegetable oil and mix together. Then gradually pour in enough warm water to bind all the dry ingredients together and form a dough (roughly 1 cup).
When the mixture is binding together take it out of the bowl and press it together with your hands so that it forms a ball, then knead it together on a clean, lightly floured surface. Everyone has their own methods of kneading but I favour stretching the dough out away from me with the heel of my palm then folding it back over, turning it 90 degree and repeating. You'll have to knead for about 10 minutes for the dough to become smooth, silky, and elastic. You'll need to flour the surface for the first 2-3 minutes of kneading as the dough will still be a bit sticky, but after that it should be OK without.
Now take a large (and I mean large, the dough is going to grow) clean (i.e. not the one you used to mix the dough in) glass bowl and lightly oil the inside, right the way up to the top. Place the now-kneaded dough in, cover with the teatowel, and put somewhere warm again. This is the bit that takes a while; your dough will need to prove for about 2 hours, until it's tripled in size and is pillowy soft and airy.
 |
| Before... |
 |
| After... |
When it looks a bit like the above you can tip the dough out of the bowl and onto a lightly floured surface. At this point you'll be able to feel how light and soft the dough is. Now you need to knock the dough back; literally punch it flat all over until the air has been knocked out. Then you need to knead it again for around 5 minutes until it's formed back into a soft ball.
Take a length of greaseproof or baking paper and cut in into large squares (about 10cm square). Cut the dough into equal quarters and roll each part into a ball, then place each ball onto a square of paper. Cover all the balls with a damp teatowel and leave for about 30 minutes (yes, again...) until the balls have doubled in size.

Pour some cold water into a wok (about 3cm deep) and bring the water to the boil on the hob. When the water's boiling (NOT BEFORE ON PAIN OF DEATH) place the bamboo steamer on top and then place the buns, still on their paper bases, inside and put the lid on top. I use a 20cm steamer and 1 bun will fit on each of the layers. Turn the heat down to a medium so that the water is still boiling but not fiercely (otherwise it'll boil away before the buns are cooked).
Steam the buns for 15 minutes; when they're done they'll still be pale in colour but will have a shiny surface and will be firm to the touch. Remove the lid from the steamer and then remove each steamer layer from the wok and set aside on a surface to cool. Don't leave the lid on the steamer while the buns are cooling; the dripping condensation will cause the buns to blister. Be careful when doing this as the steam will be ferociously hot.

Leave the buns to cool for a couple of minutes before attempting to cut them open, and when you do cut them open use a serated knife and be gentle, otherwise you'll rip the dough. Inside the buns should look just like good bread; full of air and soft to the touch.

Now your buns are (finally) ready to fill with whatever filling you like; I filled mine with sliced chicken breast cooked in oyster sauce and ginger, and raw carrot, cucumber, and spring onion cut into julienne.
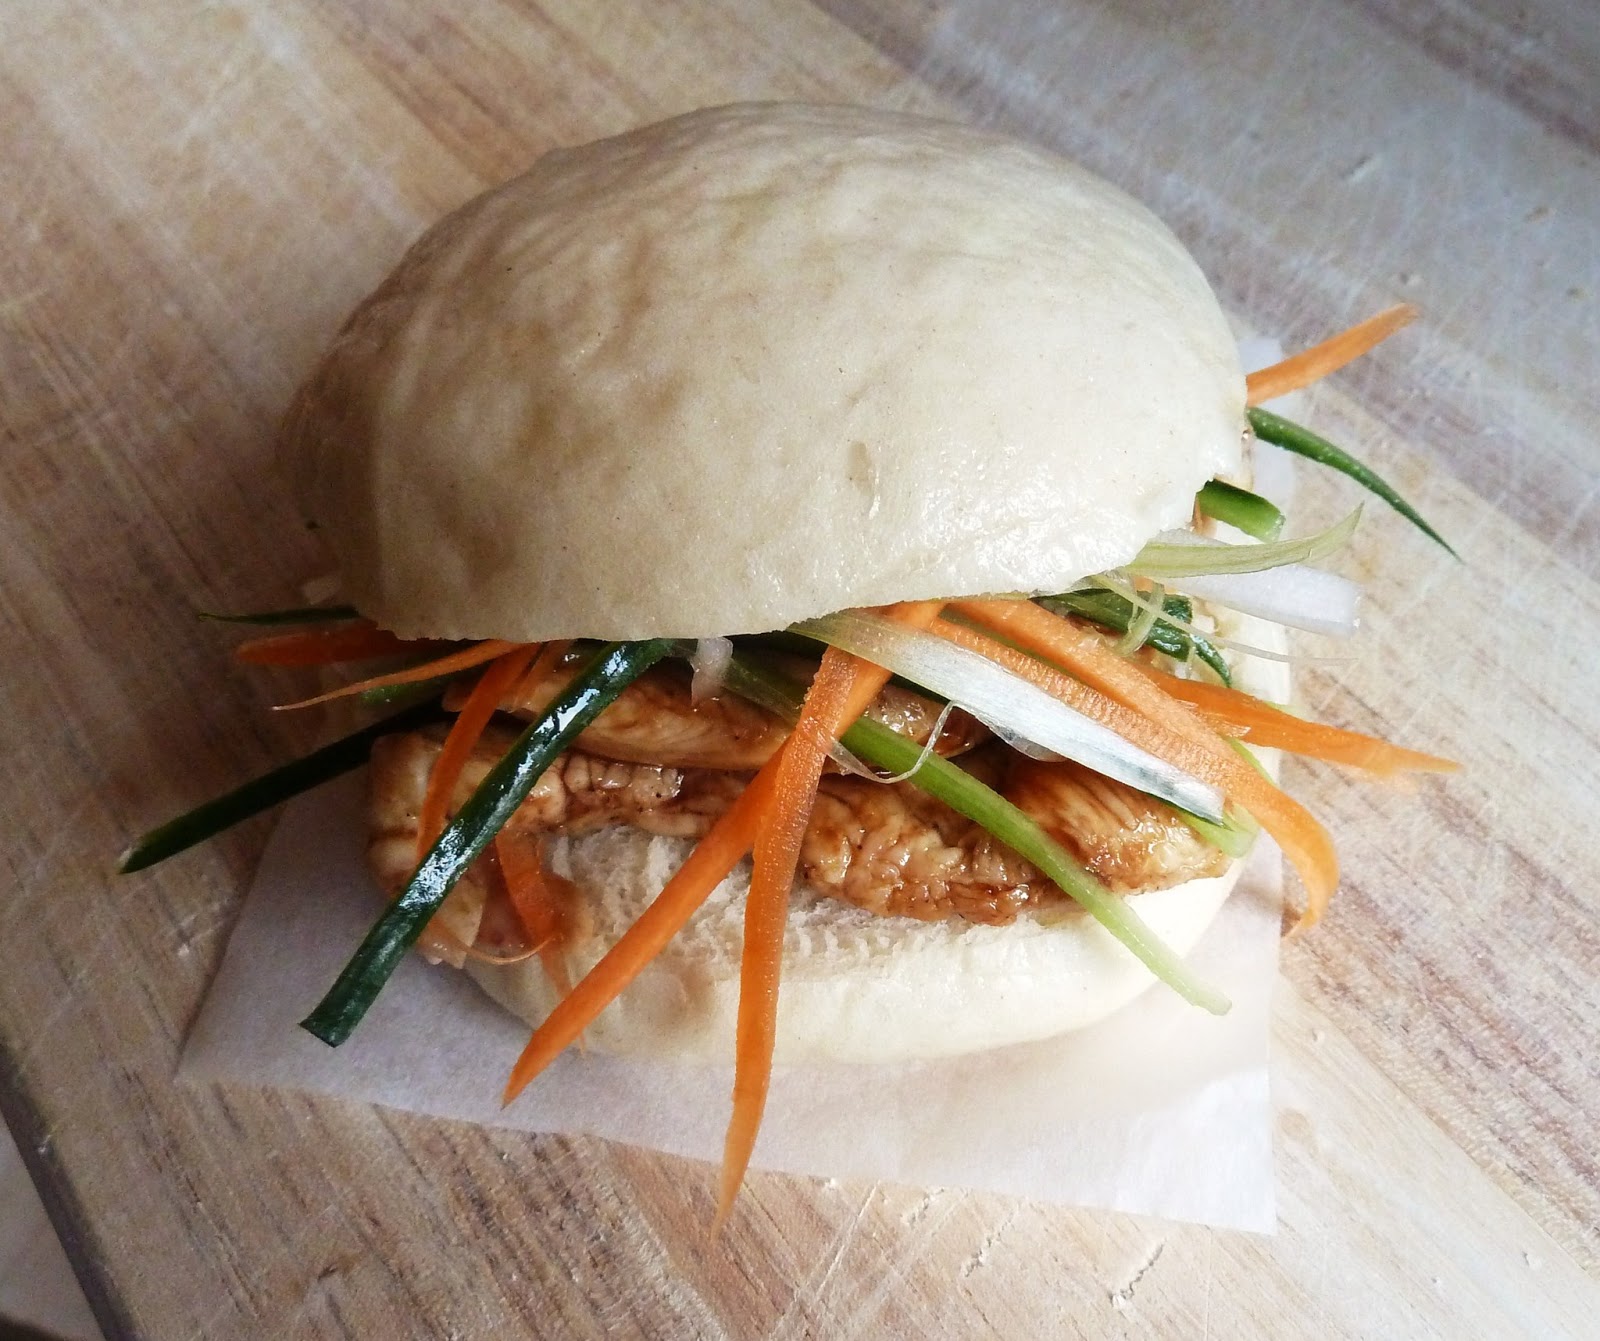
And believe me, they're even tastier than they look.
Trend Aware for 2013, Part 3: Doughnuts, out on 07.01.13
No comments:
Post a Comment